No Photo Selected

Facebooktwitterlinkedin

Today’s Question: Every now and then I run into an issue in Lightroom Classic where the preview simply shows “No photo selected”. Obviously I can then select an image to work with it, but how do I avoid this issue in the first place?

Tim’s Quick Answer: No photo will be selected if you either set a filter that no photos meet the criteria for, or you use the Select None command, or you click in an empty area of the grid view or filmstrip.

More Detail: Generally speaking, you will always have one or more photos selected in Lightroom Classic. For example, if you navigate to a different folder by default the first photo in that folder will be selected. However, there are several ways to not have any photos selected.

If you see the “No photo selected” message without having intentionally deselected all photos, then it was most likely because you inadvertently clicked in an empty area of the grid view or filmstrip. For example, if the last row of thumbnails in the grid view display doesn’t fill the available space for that row, there will be an empty area without thumbnails. Clicking in that area will cause no photos to be selected. Similarly, if the filmstrip is not fully populated you can click in the empty area to the right of the last thumbnail to deselect all photos.

If you set filter criteria that no photos in the current location match, then all images will be hidden from view based on that filter. That means no photos will be visible on the filmstrip or in the grid view, and so no photo will be selected. In this scenario you can simply turn off the filter or adjust the filter criteria so you can see some or all the photos, at which point a photo will be selected again.

There is also a “Select None” command found on the Edit menu, which you can also access by pressing Ctrl+D on Windows or Command+D on Macintosh. If you use this command intentionally or accidentally, no photos will be selected, and so you would once again see the “No photo selected” message. In the Library module if you switched from the grid view to the loupe view an image would be selected automatically, so you would no longer see the message.

In most cases you would naturally want to have one or more photos selected, so you can actually work with the selected images. However, there are situations where you would want to intentionally deselect all photos. For example, when using the “Export as Catalog” command I recommend selecting no photos, which will cause all photos in the current location to be exported. This helps ensure you don’t accidentally exclude certain photos, such as by having a filter applied.

Changing Color Label Opacity

Facebooktwitterlinkedin

Today’s Question: At one time, I found an option that allowed me to change the intensity of color of a Color Label in Lightroom Classic. For example, I could change a red label from light to dark shade of red. I can no long find this function and would appreciate your help.

Tim’s Quick Answer: You can adjust the opacity for the color label that appears on the frame around photos in the grid view using the “Tint grid cells with label colors” popup in the Library View Options dialog.

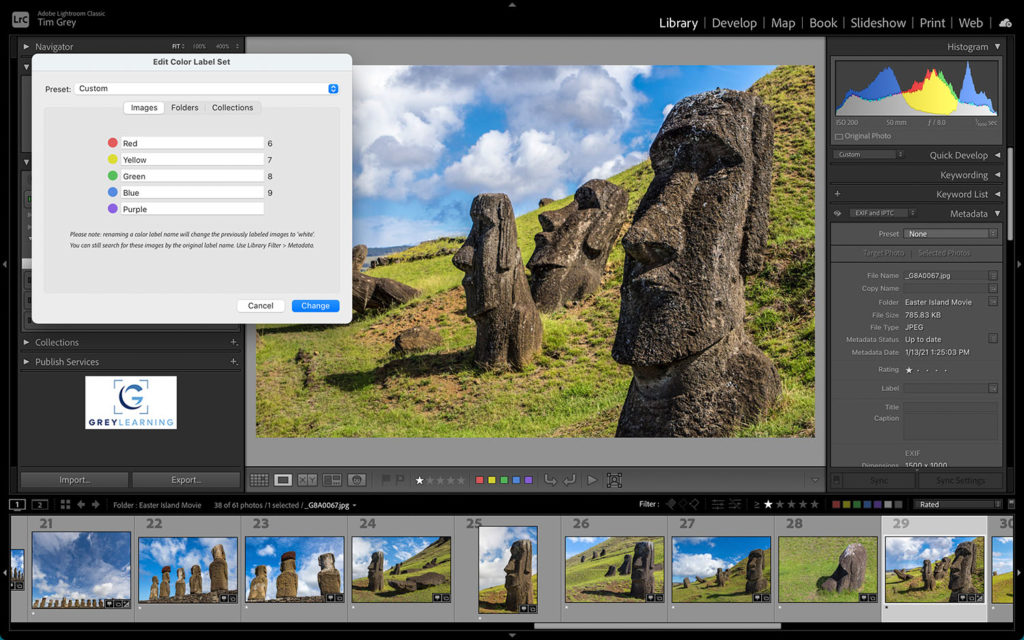
More Detail: In Lightroom Classic an indication of the color label you have assigned to a photo is shown as a color tint on the frame around the image in the grid view display, as well as on the filmstrip on the bottom panel. By default, this tint is set to an opacity of 20%, which results in a color tint that doesn’t necessarily stand out as much as you might like. Fortunately, you can adjust the setting for this color label tint.

To get started, go to the Library module and from the menu choose View > View Options to bring up the Library View Options dialog. Go to the Grid View tab, and in the Options section at the top of the dialog you’ll find the “Tint grid cells with label color” checkbox. Make sure the checkbox is turned on, and then select an opacity setting from the popup to the right.

The available options for opacity range from 10% to 50% in 10% increments. In my opinion the 10% option is far too faint, to the point that I feel I would not really notice the color labels at all. I personally prefer the 50% option, because it makes the color labels stand out very clearly, and I do tend to use color labels somewhat frequently in my workflow.

If you make sure that images with color labels assigned are visible before you bring up the Library View Options dialog, you will see the tint for color labels update in real time in the background, so you can better determine which setting you prefer to use. Note, by the way, that you can also turn off the color tint altogether by turning off the “Tint grid cells with label colors” checkbox.

Font Constantly Resets in Photoshop

Facebooktwitterlinkedin

Today’s Question: When I go to use the Type tool in Photoshop no matter which font I select, the font reverts to Myriad Pro when I add a text layer to the image. I then type in what I want and highlight the text and then I can switch the font to something other than Myriad Pro. Anything else you might suggest?

Tim’s Quick Answer: You can correct this issue by turning on the “Fill new type layers with placeholder text” checkbox on the Type tab of the Preferences dialog in Photoshop.

More Detail: At first this seemed like a very odd issue that I assumed would only affect a small number of users, perhaps even only affecting the one person who sent the inquiry. But I have been able to reproduce the issue and find the somewhat unexpected solution.

In short, if you select the Type tool in Photoshop and then select a font from the Options bar before adding a text layer, the font will revert to Myriad Pro. I’ve confirmed this behavior on several different computers, so I believe it is a general bug in Photoshop.

However, I have discovered that if you turn on the “Fill new type layers with placeholder text” checkbox on the Type tab of the Preferences dialog, the font is retained even if you select the font before adding the text layer. Regardless of the setting, you can always successfully change the font after adding the text layer.

So, if the Type tool in Photoshop seems to insist on making use of the Myriad Pro font, open the Properties dialog by choosing Edit > Preferences > Type on Windows or Photoshop > Settings > Type on Macintosh. Note that on older Macintosh operating systems the menu command is found at Photoshop > Preferences > Type.

In the Type Options section of the Type tab of the Preferences dialog you can then turn on the “Fill new type layers with placeholder text” checkbox. Click the OK button to close the Preferences dialog.

With this option turned on, you can select a font before adding a text layer and the layer will retain the selected font. The layer will also be filled with the “Lorem Ipsum” placeholder text, which will be highlighted. You can therefore simply start typing the text you wanted to add, and the placeholder text will be replaced while retaining the selected font.

Safely Using Catalog on Two Computers

Facebooktwitterlinkedin

Today’s Question: I keep all my images on a mirrored hard drive setup, so I have ready access to my images regardless of which computer I’m using. The “issue” has to do with the Lightroom Classic catalog: how do I make sure I’m always using the same catalog without having to keep current copies on both computers? I’m thinking that putting the catalog on a small, external, SSD that I plug into the computer I’m using at the moment would be the solution?

Tim’s Quick Answer: Yes, in my view the best solution for using Lightroom Classic on more than one computer is to store the catalog (and generally the photos) on an external hard drive that you transfer between the computers.

More Detail: With Lightroom Classic the catalog is used locally to manage the information about your photos, and the catalog can’t be stored on a network drive. It is possible to store the catalog on a synchronized cloud-based storage service, such as Dropbox or Google Drive, but I do not recommend using this approach due to the risk of the catalog files getting out of sync when used across more than one computer.

Therefore, I consider the safest approach to be storing the catalog on an external hard drive. You can quit Lightroom Classic and then copy the entire folder containing the catalog and related files to an external hard drive. If you have your photos on an external hard drive, you could use that same drive for the catalog folder.

Once the catalog is stored on an external hard drive, you can simply open the catalog from that external hard drive from whatever computer you’re currently using. If the photos are also on that same hard drive, this provides a convenient way to manage all your photos and catalog files in one location. The important thing is that on each computer the path to the photos remains the same. That means, for example, having the same drive letter assigned to the drive on each computer if you’re using Windows, or making sure the volume label remains the same if you’re using Macintosh.

So, if you keep the catalog on an external hard drive, you can simply move that hard drive between computers and open the catalog from the external hard drive, so you never need to worry about using the wrong copy of the catalog when you switch between computers.

Extracting a Photo from Video

Facebooktwitterlinkedin

Today’s Question: I accidentally hit Video instead of Photo while taking iPhone photos of my grandchildren, and would like to know how to retrieve single photos from the video.

Tim’s Quick Answer: You can extract a still image from a video clip by opening the video in Photoshop, by using the Capture Frame option in Lightroom Classic, or even by capturing a screenshot on your iPhone.

More Detail: There are several ways you can extract a still image from a video clip, but it is important to keep in mind that the resulting photo may be at a lower resolution than a still image, depending on the video format that was used. When selecting which frame of the video to use, be sure to confirm that frame is sharp. Video is generally recorded with a relatively slow shutter speed, so there is a chance that some frames will be slightly blurry even if the video doesn’t seem blurry during playback.

You can open a video file in Photoshop, and then use the playhead slider on the Timeline panel to go to the frame you want to save as a still image. Then go to the menu and choose File > Save a Copy, which will enable you to save the current frame as a new image.

If you’re using Lightroom Classic you can also use the Capture Frame command to create a still image. Browse the video in the Library module using the loupe view, and drag the playhead to the position of the desired frame in the video. Then click the frame icon to the right of the timecode showing the minutes and seconds, and choose “Capture Frame” from the popup menu. This will create a still image from the current frame, which will be saved alongside the video.

You can also capture a screenshot on the iPhone to create a still image based on the video. To do so, open the video in the Photos app and pause at the point in the video you want to capture a still image from. Tap the screen to hide the controls, and then press the power button and the volume up button at the same time.

If you use Photoshop or Lightroom Classic to create a still image from the video, the still image will have the same resolution as the original video. That would be either 4K (approximately 4,000 pixels across) or 1080p (1,080 pixels across) depending on the setting for the Camera app in Settings on your device. If you create a screen capture the resolution will depend on the display resolution of your specific iPhone model.

Online Workshop: Organizing Photos in Lightroom Classic (June 2023)

Facebooktwitterlinkedin

I’m happy to announce that I will be teaching an online workshop soon, focused on helping photographers get organized in Adobe Lightroom Classic. Photographers who participate in this online workshop will have the opportunity to get their questions answered directly from me both during the live online class sessions and via follow-up email.

The workshop will include six live online sessions of about two hours each, running from June 5th through the 16th. All sessions will be recorded so they can be reviewed at any time. If you’d like to improve your organizational workflow in Lightroom Classic so you’ll have the confidence of being able to find any photo quickly, you can register to join me for this online workshop here:

https://www.greylearning.com/courses/online-workshop-organizing-photos-in-lightroom-classic-june-2023

Topaz versus Adobe Denoise

Facebooktwitterlinkedin

Today’s Question: Based on your research, how does the Adobe version of AI-driven Denoise feature stack up against the Topaz Photo AI tool? The Topaz tool has many folks saying it does a better job of both sharpening and “denoising” than Adobe.

Tim’s Quick Answer: Overall I would say that Adobe’s AI Denoise feature is a little better than Topaz DeNoise AI, though both do offer very good results.

More Detail: Topaz DeNoise AI is certainly impressive, but my testing has demonstrated that Adobe’s new Denoise feature (available in Camera Raw and Lightroom) is a little better.

In general, I have found that Topaz DeNoise AI is too aggressive with smoothing of images, resulting in too much loss of texture. I also found that it tends to leave behind more color noise artifacts, even though the smoothing is more aggressive. In addition, Topaz DeNoise AI requires more input from the user in terms of noise-reduction settings, compared to a single slider for the Denoise feature from Adobe.

To be sure, Topaz DeNoise AI is very good at noise reduction. Some photographers may even prefer the Topaz solution because they prefer smoother images. However, I do find the aggressive smoothing in Topaz to be problematic most of the time.

I should hasten to add that while I feel the Adobe Denoise feature is a little better than the Topaz software, I am still generally able to get better results with most images using the manual noise reduction features in Adobe software (Lightroom Classic and Camera Raw) compared to both Adobe’s new Denoise feature and Topaz DeNoise AI. Of course, as these products continue to improve, I suspect we’ll soon get to the point that the AI noise reduction will exceed the quality of the manual approach for all images.

GreyLearning Ultimate Event: Backing Up Your Photos

Facebooktwitterlinkedin

Registration is now open for my next live online GreyLearning Ultimate Events, focused on “Backing Up Your Photos”. The live online event will be on Wednesday, May 17th, from 1pm to 5pm Eastern Time.

What’s so “ultimate” about the “GreyLearning Ultimate Events”? Well, to start with they’re free to photographers who subscribe to my GreyLearning Ultimate Bundle (http://timgrey.me/atg99bundle). Recordings of all presentations will also available, so you can watch even if you can’t attend live, or review the presentations at any time. Importantly, these events leverage my extensive experience in photography, digital imaging, and more, to provide in-depth information to help you master the subject matter presented.

If you’re not a GreyLearning Ultimate Bundle subscriber, that’s OK! Non-subscribers can attend the live online event and access recordings of all presentations for just $20.

You can get all the details of this upcoming live online event here:

https://www.greylearning.com/courses/greylearning-ultimate-event-backing-up-your-photos-may-2023

I look forward to helping photographers ensure their photos are backed up securely with this upcoming GreyLearning Ultimate Event!

New AI Denoise Noise Reduction

Facebooktwitterlinkedin

Today’s Question: I see that Adobe has added an AI noise reduction feature to Lightroom Classic [and Camera Raw in Photoshop]. Do you recommend using this new option over the manual approach to noise reduction?

Tim’s Quick Answer: While I find that the new AI-based noise reduction available in Lightroom Classic as well as Camera Raw in Photoshop is very good, I do find that I’m able to get slightly better results with the manual noise reduction controls.

More Detail: The new AI-based Denoise feature from Adobe is impressive, to be sure. With a careful adjustment of the strength of the effect you can get a very good result with minimal effort. However, there are some drawbacks based on my testing.

First, when you use the Denoise feature you will be creating a new Adobe DNG file rather than applying noise reduction to the existing raw capture. This can be a minor disadvantage in terms of having an “extra” file to manage, but I don’t consider this to be a major barrier.

I’ve also found that the default value of 50 for the Amount slider is far too aggressive, resulting in considerable loss of detail and texture in the image. I recommend starting at a value of around 20 for Amount, fine-tuning based on the specific image you’re working on, and the results you’re seeing in the preview. But in my testing a value of around 20 for Amount was far superior to the results I achieved with the default value of 50.

The results with the new Denoise feature compared to the manual noise reduction controls were rather mixed. I was consistently able to retain better texture and detail in images with manual noise reduction, but I was able to retain more of the natural colors, especially in small areas, using the new AI-based Denoise feature.

Based on my experience, I would say that the manual approach is best when your priority is to minimize the appearance of noise while retaining texture and detail in the image. If the priority is to retain even the finest color details and you’re willing to slightly degrade texture and detail, then the AI-based Denoise feature may work better. I’ve also found that the best solution varies depending on the image, so it isn’t a bad idea to test both options for images that exhibit considerable noise.

I think it is worth keeping in mind that the new Denoise feature is new and will certainly be improved over time. In addition, because the image is based on artificial intelligence, as more images are processed the quality of the results will surely improve over time as well.

The Denoise feature is found in the Detail section where the existing noise reduction controls are found. You simply click the Denoise button, adjust the Amount setting in the Enhance dialog, and click the Enhance button to process the image and create the new DNG file. The process is simple, but I do find that I’ve been able to achieve better results in general using the existing manual controls for noise reduction.

Rotating a Single Layer

Facebooktwitterlinkedin

Today’s Question: I’m trying to rotate one image layer in a composite image in Photoshop by 180 degrees. However, when I use the rotation command all layers in the entire image rotate. Is there a way to only rotate a single image layer?

Tim’s Quick Answer: To rotate an individual image layer in Photoshop you need to use a command found on the Edit > Transform menu, rather than on the Image > Image Rotation menu.

More Detail: In Photoshop you’ll find a set of rotation commands on the Image > Image Rotation menu, which includes options for a 180-degree rotation, a 90-degree rotation either clockwise or counter-clockwise, and an Arbitrary option for rotation by any number of degrees. However, these options are for rotating the entire image, including all image layers, not just the currently selected layer.

If you want to rotate an individual image layer, start by clicking the thumbnail for that layer on the Layers panel so the applicable layer will be selected. Then from the menu choose Edit > Transform. There you’ll find options for a 180-degree rotation or a 90-degree rotation either clockwise or counter-clockwise. These commands will only rotate the currently active layer on the Layers panel, not the entire image.

Note, by the way, that there are also options to flip the image either horizontally or vertically on both of these menus. As noted above, the commands on the Image > Image Rotation menu will flip all layers for the entire image, while the commands found on the Edit > Transform menu will only flip the currently selected layer on the Layers panel.