Today’s Question: Apparently when downloading photos from camera/card with Adobe Bridge the files cannot be renamed using dates in the format YYYY-MM-DD, as all my previous photos are named (and sorted!). Also, I cannot separate Raw photos from JPG’s during the import. Do you see any solution to my wishes?
Tim’s Quick Answer: You can most certainly rename photos using Adobe Bridge in a year-month-day format, either during download or later in your workflow. While you can’t automatically separate raw captures from JPEG images during import, you could easily filter the images by file type after the import.
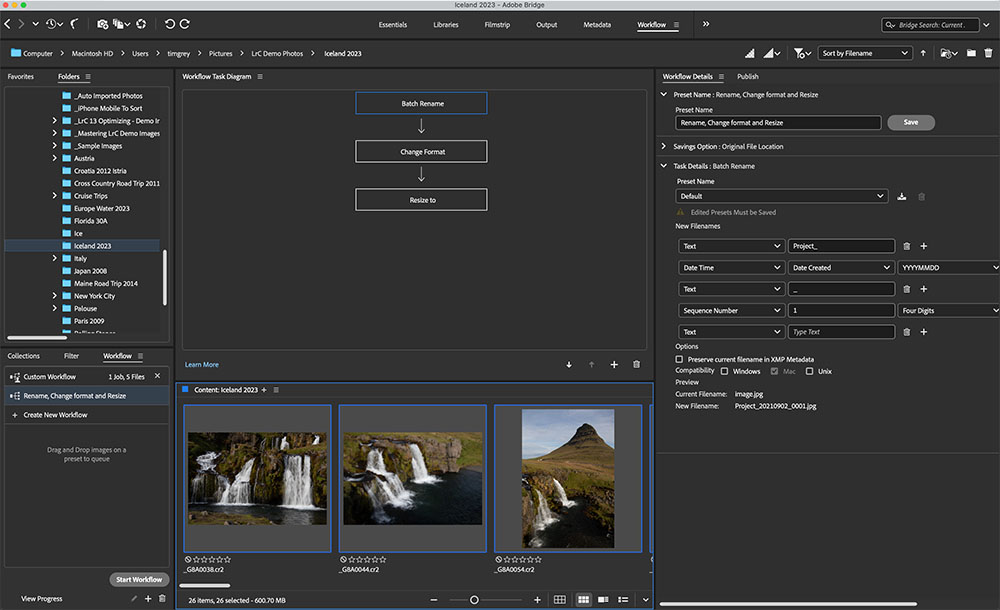
More Detail: Adobe Bridge enables you to rename photos either during the process of downloading using the Photo Downloader feature, or later in your workflow by selecting the images and choosing Tools > Batch Rename from the menu.
If you simply want to use the date and a sequence number for the filename of each photo, and you don’t mind not having dashes between the date values, you can choose the “Shot Date (yyyymmdd)” option from the Rename Files popup. If you want to include other components in the filename structure or want to include dashes in between the year, month, and day values, you can instead choose Advanced Rename from the popup.
In the Advanced Rename dialog you can specify a filename structure that includes the year in four-digit format, a text field including a dash, the month in two-digit format, another dash, and then the day in two-digit format. I used this exact example (with additional text and a sequence number) as the file renaming example in Chapter 2, Lesson 5, on “Renaming Photos” in my video course “Adobe Bridge for Photographers”.
When downloading photos with Photo Downloader in Bridge you’re not able to automatically filter raw versus JPEG captures. However, you could download all photos to the same folder, and then use the File Type option on the Filter panel to filter based on only the raw captures or only the JPEG images. You could us this approach to move all the JPEG images to a subfolder, for example, or otherwise deal with the different file types individually.
You can learn more about using Adobe Bridge to download or rename photos (and much more) with my “Adobe Bridge for Photographers” video course. More details can be found on the GreyLearning website here:
https://www.greylearning.com/courses/adobe-bridge-for-photographers
![]()