Accurate Image and Ruler Size in Photoshop

Facebooktwitterlinkedin

Today’s Question: Your answer about measuring sizes in an image in Photoshop reminded me that, I believe, there is a way to make the rulers and the image an accurate size. Can you remind me how to do that if it is indeed possible?

Tim’s Quick Answer: You can get an accurate preview of the print size of an image, which translates to the rulers being at an accurate scale, by establishing an accurate display resolution value in Preferences in Photoshop.

More Detail: The “Print Size” zoom setting in Photoshop is intended to provide an accurately sized preview image based on how large the image will print, which in turn would mean the rulers would be accurate. However, this only works accurately if you update Preferences to reflect the true pixel-per-inch (PPI) resolution of your monitor display.

The first step is to calculate the actual resolution for your display. Start by measuring the physical width of the display area of your monitor as accurately as you can. Then determine the number of pixels wide the display is based on the resolution setting for the display in the operating system.

For example, let’s assume a display that measures 20.75-inches across with a resolution of 1920×1080. Dividing the 1920 horizontal resolution by the width of 20.75 results in a pixel-per-inch resolution of 92.53.

You can then bring up the Preferences dialog in Photoshop. On Windows start from the Edit menu on the menu bar, and on Macintosh start from the Photoshop menu. Then choose Preferences > Units & Rulers. In the “New Document Preset Resolutions” section at the top-right of the dialog set your calculated value in the Screen Resolution field, with the popup to the right set to the applicable unit of measure, which in this case would be “Pixels/Inch”. Click the OK button to close the Preferences dialog.

When you want to view an image at a size that will match the print size based on the document dimensions, you can choose View > Print Size from the menu. To display rulers along the top and left edges of the document area, choose View > Rulers from the menu. With the image set to the Print Size zoom setting you can use an actual ruler to verify the accuracy of the rulers displayed alongside the image.

Measuring Size within a Photo

Facebooktwitterlinkedin

Today’s Question: I recently took a headshot for my passport renewal. The requirements are that the head be between 1” and 1.5” from top of head to chin, while the overall picture be 2”x2”. I set the canvas and image size to 2×2, but I could not find an easy way to measure the head size in Photoshop. The only option seemed to be to set guides and calculate the difference between them. Is there an easier way?

Tim’s Quick Answer: While guides can be helpful for establishing dimensions within an image, you can also measure an object within a photo using the Ruler tool or with the Rectangular Marquee or Elliptical Marquee selection tools.

More Detail: There are several ways to measure an area within a photo in Photoshop, though none of them are quite perfect.

In this scenario you could place guides in the image and use them as the basis of resizing the image layer to fit within the dimensions defined by the guides. One of the easiest ways to precisely position guides is to choose View > Guides > New Guide from the menu. In the New Guide dialog specify if you want the guide to be a horizontal or vertical line and enter a value for the Position field. The position can be defined in various units of measure, including inches by entering a number followed by “in”, such as “0.25 in”.

With the example of a passport photo, you could add horizontal guides at 0.25 inches and 0.5 inches representing the top limits, and at 1.5 inches and 1.75 inches for the lower limits. Then resize the image layer representing the passport photo to fit within the dimensions.

If you just need to measure an area of the image, adding guides isn’t likely to be the most convenient approach. Instead, the Ruler tool provides a good solution. You’ll want to make sure the pixel-per-inch (PPI) resolution of the image is set for the intended output resolution and size, which you can adjust by choosing Image > Image Size from the menu. Then make sure the rulers are displayed around your image, which you can toggle by choosing View > Rulers from the menu. Right-click on the ruler at the top or left of the image and select Inches (or the intended unit of measure) from the popup.

The Ruler tool can be found on the toolbar on the button associated with the Eyedropper tool. So, you can right-click on the button for the Eyedropper tool to bring up a popup menu where you can select the Ruler tool. Then drag on the image to measure, holding the Shift key to constrain the measurement to perfectly horizontal or vertical. The measurements are shown on the Options bar, so you could reference the “W” (width) value for a horizontal line or the “H” (height) value for a vertical line.

With the Rectangular Marquee tool, you can choose Fixed Size from the Style popup on the Options bar, and then set a value for Width and Height, using “in” after the numbers to designate inches as the unit of measure. You can then click within the image to place the selection at the designated size.

Managing Maxed Out Storage

Facebooktwitterlinkedin

Today’s Question: What would be your suggestion when I have maxed out my 20TB external hard drive?

Tim’s Quick Answer: While you could certainly find storage options with higher capacity, I do think it is reasonable to divide storage across more than one hard drive when there isn’t a practical solution to increase storage on a single drive.

More Detail: Once you get beyond about a dozen or so terabytes, there aren’t as many options available for hard drive storage, and those that are available tend to be relatively expensive. If you have specific requirements for hard drive features, your options will be even more limited. Therefore, it may make more sense to divide your photos across more than one hard drive rather than trying to find enough storage capacity in a single device.

To be sure, there are large storage options, such as hard drive arrays and network attached storage (NAS) devices. These consist of enclosures that contain multiple hard drives that appear as a single storage device to your computer. This provides a high-capacity storage solution that can be expanded over time by adding hard drives or replacing existing drives with higher capacity drives.

For example, the Promise Technology Pegasus32 (https://bhpho.to/3VqyBY0) is a hard drive array that is pre-configured with 32 terabytes of storage capacity. This is a relatively straightforward solution in that it connects to your computer via Thunderbolt 3 just like many smaller hard drive options.

A similar option is available via a NAS device, such as a Synology DiskStation (https://bhpho.to/3XukGCa) featuring six bays for hard drives, with an eight-bay model available as well. Note that in this case the device does not include hard drives, so you would need to buy those separately. A NAS device connects to a network so that any computer on the network can access the storage.

These types of high-capacity storage devices require a bit more technical knowledge than a traditional hard drive, and they can be more expensive than more basic storage devices. Therefore, if you need particularly large amounts of storage capacity you may find it simpler to divide your photos and other data across more than one hard drive.

This is an issue I’ve run into myself. Because I generally travel somewhat frequently, I prefer to use external hard drives that are bus-powered, meaning they don’t require a power adapter. Specifically, I use LaCie Rugged (https://timgrey.me/rugged5t) hard drives, which have a maximum capacity in the form factor I prefer of five terabytes. There is an eight-terabyte model (https://bhpho.to/3S8aYCt), but the size is a bit awkward in my view.

Because I’m storing my photos across two hard drives, I use one drive for the photos I’m most likely to use most frequently, with photos I am likely to need less often stored on a secondary hard drive. This system works well for me, even though I’d prefer being able to store all my photos on a single hard drive.

Of course, another option that can help is to review your photos and delete outtakes more aggressively than you have in the past. This is a project I’ve started to undertake, which could potentially get my storage needs back down to the point that a single bus-powered hard drive will be able to accommodate all my photos.

Limits of Duplicate Detection in Lightroom Classic

Facebooktwitterlinkedin

Today’s Question: I have always assumed that “Don’t Import Suspected Duplicates” only applied to photos that had been previously imported. Your response to the question [from yesterday] implies that Lightroom Classic recognizes identical copies of photos that have not yet been imported. What metadata is used to identify the duplicates? How to Lightroom Classic determine which photos get imported versus not? Will photos be deemed duplicates if they have slightly different file names?

Tim’s Quick Answer: Duplicates can be detected even when importing with the “Add” option in Lightroom Classic, though there are some limitations that can cause problems depending on how the files were renamed.

More Detail: Lightroom Classic determines which photos are duplicates by evaluating the original filename (which is not necessarily the same as the current filename), the capture date and time, and the file size. When it comes to the filename, however, in some cases a duplicate will still be detected if the filename doesn’t match, depending on how the file had been renamed.

When you use Lightroom Classic to rename a photo, the original filename will be added to the “Original Filename” field in metadata. Other software such as Adobe Bridge includes this option as well. When an original filename is found in this field, Lightroom Classic uses that as the filename being evaluated to determine duplicates.

If you had renamed the photos using software that preserves the original filename in the Original Filename field of metadata, then Lightroom Classic would still be able to accurately detecting duplicates. If, however, you were to manually rename the photos such as through the operating system, then the photos would not be identified as duplicates due to the filename mismatch.

The context of the original question in yesterday’s Ask Tim Grey eNewsletter was a photographer who had been previously using Lightroom Classic, but who wanted to start fresh with a new catalog after replacing their computer. Therefore, any renaming would have likely been done using Lightroom Classic, and the duplicates would have been detected accurately.

When duplicates are detected during the import of a large number of photos using the “Add” option in the Import dialog, you don’t have any control over which of the files will be considered originals versus duplicates. Therefore, if there is any doubt about the status of the two versions of photos being imported, you may want to import all of them with the “Don’t Import Suspected Duplicates” checkbox turned off, and then deal with identifying duplicates with a more manual process in your workflow.

Removing Duplicate Photos

Facebooktwitterlinkedin

Today’s Question: There are many duplicate photos on my hard drive, and I want to import them into a fresh Lightroom Classic catalog. You have recommended to enable the option in Lighroom Classic to not import duplicates. If that works, what do I do with the duplicate images left on the external hard drive? Is there another program that eliminates duplicates that I should run on the hard drive before I do the import?

Tim’s Quick Answer: In this scenario I recommend a workflow that will help you identify and review the duplicates within Lightroom Classic. This would involve initially excluding duplicates from being imported, but then importing the duplicates as well so they can be compared before deletion. Labels can be used to distinguish the two categories of photos.

More Detail: The “Don’t Import Suspected Duplicates” option in the Import dialog in Lightroom Classic can be tremendously helpful when importing new photos from a memory card. Turning this checkbox on will ensure that if you had previously imported photos from a media card and then captured new photos without formatting the card, you won’t end up duplicating the first batch of photos with a second import.

However, this isn’t an ideal option when importing a large group of photos using the “Add” option in the Import dialog. That’s because while the duplicate photos will be prevented from being imported into your catalog, those duplicates will still be taking up space on your external hard drive.

To work around this, you can use a workflow that will enable you to identify the duplicates and then review them before choosing whether to delete them. To illustrate this I’ll assume the use of an external hard drive that is being used for the exclusive storage of photos.

Start by importing with the “Don’t Import Suspected Duplicates” checkbox turned on in the Import dialog. Select the external hard drive as the source of photos to be imported, with the “Include Subfolders checkbox turned on. Choose “Add” from the set of options at the top-center of the Import dialog. Adjust any other settings as you’d like and click the Import button to import only the non-duplicate photos.

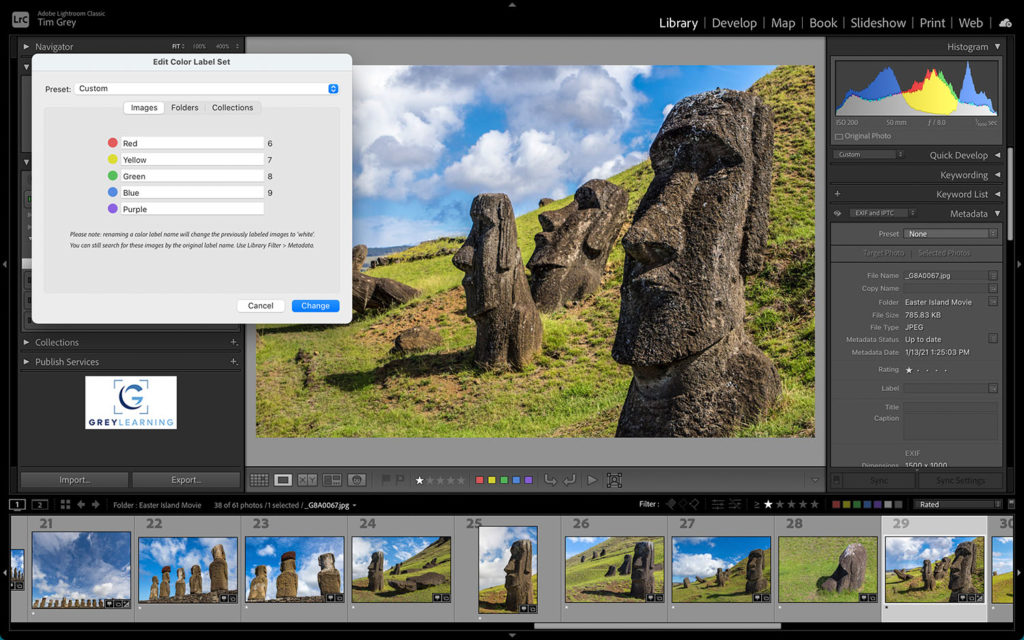
Next you could mark all the imported photos as being the “original” copies, such as with a color label. Start by selecting the “All Photographs” collection in the Catalog section of the left panel in the Library module. Make sure there aren’t any filters set on the Library Filter bar so you’re seeing all photos. Then select all the images by choosing Edit > Select All from the menu. Switch to the grid view display so you can update metadata for all selected photos.

You can then use a keyboard shortcut to assign a color label, for example, to mark these photos. If you press the number 6 on the keyboard a red color label will be assigned, for example, but you can use any attribute you’d like for this purpose as long as it won’t interfere with any metadata that had already been assigned to the photos before import (including the duplicate photos that haven’t yet been imported).

At this point you can import the duplicate photos that were skipped in the initial import. Make sure you can see the top-level storage location on the Folders list, such as a folder representing the external hard drive in this example. If that folder isn’t displayed, right-click on a top-level folder on the Folders list and choose “Show Parent Folder” from the popup.

To import the photos that had been excluded with the first import, right-click on the folder representing the external hard drive (or other primary folder location) and choose “Synchronize Folder” from the popup menu. In the dialog that appears you’ll see a count of how many new photos will be imported. After the tally is complete, click the Synchronize button.

At this point you will have all your photos in the catalog, with the first batch having an attribute (such as a color label) that you’ve assigned and the second batch not having that attribute. You can then review the images with versus without that attribute and confirm which images are truly duplicates that should be deleted.

App for Location Track Logs

Facebooktwitterlinkedin

Today’s Question: You talked about track logs [for tracking location alongside a camera without GPS capabilities]. Could you recommend a smartphone app that does this please?

Tim’s Quick Answer: For recording GPS track logs I recommend the app “GPS Tracks” (https://timgrey.me/gpstracks) for iPhone users and “A-GPS Tracker” (https://timgrey.me/gpstracker) for Android users.

More Detail: If your camera doesn’t have a built-in GPS receiver you can still add location information to the metadata for your photos relatively easily using the Map module in Lightroom Classic. One way to automate the process is to record a track log during the time you’re capturing photos for which you want to record location details.

I use the iPhone app “GPS Tracks” for recording track logs. You can find this app in the Apple App Store here: https://timgrey.me/gpstracks. For Android users I recommend the “A-GPS Tracker” app, which you can find here: https://timgrey.me/gpstracker.

When you’ll be capturing photos for which you want to record location information you start recording a track log on your smartphone. When you’re finished you stop recording the track log and then save the resulting GPX file in the same folder as the photos it is associated with.

In Lightroom Classic you can then synchronize the track log with the applicable photos. Select the photos, and then in the Map module click the track log (zig-zag icon) button on the toolbar below the map. Choose “Load Tracklog” from the popup, and select the GPX file. Then, with the track log loaded and the photos selected, click the track log popup again and choose “Auto-Tag Selected Photos”. This will synchronize the selected photos with the track log so that GPS coordinates are added to the metadata for the photos based on the capture time and your recorded position at that time.

Online Workshop: “Cleaning Up Your Mess in Lightroom Classic”

Facebooktwitterlinkedin

Just in time for a New Year’s Resolution, in January I’ll be teaching an online workshop focused on “Cleaning Up Your Mess in Lightroom Classic”.

Register now and take advantage of early Black Friday savings on this upcoming online workshop focused on helping you streamline your Lightroom Classic catalog and workflow. You’ll learn how to reconnect missing photos and folders, merge multiple catalogs into one, clean up a cluttered folder structure, and much more. Along the way you’ll have direct access to me so you can get answers to your questions, both during the live online workshop sessions and via follow-up email.

The normal price for this online workshop is $99, but for our Black Friday special you can sign up for just $59.

Get all the details, and register to join me, here:

https://www.greylearning.com/courses/online-workshop-cleaning-up-your-mess-in-lightroom-classic-2023-01

Unwanted Cropped when Switching Tools

Facebooktwitterlinkedin

Today’s Question: I’ve run into an issue where if I select the Crop tool in Photoshop, then change my mind and switch to another tool, the image gets cropped without asking if I want to apply the crop. I don’t think this was always the case, but is there a way to disable this unwanted cropping?

Tim’s Quick Answer: If there is a crop set with the Crop tool in Photoshop, you must click the “reset” or “cancel” button on the Options bar (or press the Esc key on the keyboard) to cancel the crop. If you simply switch to a different tool the current crop will be applied to the image.

More Detail: There have been a number of changes to the Crop tool over the years that I have found frustrating, but the change in behavior where you are no longer asked if you want to apply the crop when you switch to a different tool from the Crop tool is particularly frustrating.

In the past, if you selected the Crop tool but then switched to a different tool, a dialog would appear asking if you want to apply the crop. It appears this was changed with a recent update to Photoshop. If you had the crop tool set to a specific crop ratio, such as 1:1 to crop to a square, that setting would remain when you then switched back to the crop tool while working with another image later.

In this scenario, simply selecting the Crop tool by mistake and then switching to the actual tool you intended to use will cause the image to be cropped to a square.

To avoid this issue, you need to be sure to either press the Esc key on the keyboard, click the “cancel” button (the circle with a slash icon) on the Options bar, or reset the Crop tool settings by clicking the “reset” button (the counter-clockwise arcing arrow icon) on the Options bar.

Unfortunately, I don’t know of any way to permanently turn off this automatic crop other than to reset or cancel the crop. I would love to be able to prevent this behavior, as I don’t think it makes any sense at all.

Auto-Eject Media Card

Facebooktwitterlinkedin

Today’s Question: In previous versions of Lightroom Classic, I enabled a setting to automatically eject the memory card following import. In recent versions, I have not been able to find the configuration setting. Is it still available somewhere?

Tim’s Quick Answer: If the “Eject after import” checkbox is not shown at all in the Import dialog in Lightroom Classic, it is an indication that the card you’re importing from is being treated as a hard drive rather than a media card. This would be the case with some of the newer cards such as CFexpress and XQD.

More Detail: The “Files” versus “Devices” categories in the Import dialog can be a little confusing, especially since most memory cards will appear under both “Devices” and “Files”. There are some issues in the background that led to this, and in general you’ll get better performance by making sure you select the source under Files rather than Devices.

For removable media devices that support being automatically ejected, you’ll see a “Eject after import” to the right of the Devices heading on the left panel in the Import dialog. Even if you select the media card as a source under the Files section (as is recommended) if you have the “Eject after import” checkbox turned on the media card will still be ejected via the operating system. That means the card can be removed from the card reader without having to go through the process of ejecting through the operating system.

However, some of the newer types of memory cards are designed in such a way that they are treated as an external hard drive by the computer, rather than a removable media device (even though external hard drives can and should also be “ejected” through the operating system). For these cards the “Eject after import” checkbox won’t be displayed and therefore you’ll need to eject the card manually using the “Eject” feature on Macintosh or the “Safely Remove” feature on Windows.

Print Button Disabled in Lightroom Classic

Facebooktwitterlinkedin

Today’s Question: The Print button is grayed out in Lightroom Classic. I can print from Photoshop but not Lightroom Classic. How can I fix this?

Tim’s Quick Answer: This is an indication that you have the “Print to” option set to “JPEG File” in the Print Job section at the bottom of the right panel in the Print module. Change that to “Printer” and you’ll be able to print again.

More Detail: The Print module in Lightroom Classic is obviously focused on enabling you to print your photos. Templates can be used as the foundation of creating a print layout, which makes it easy to print a single photo of a given size, to print the same photo multiple times on a page, or to print multiple different photos on a page.

In addition to being able to print your photos based on the layouts you create, you can also generate a JPEG file that reflects the same page layout you might otherwise prepare for print.

This can be very helpful when you need to share photos with clients, for example. You might create a contact sheet layout for a batch of photos, and then generate JPEG files for each page of the print job to deliver via email rather than having to share printed pages with the client.

There are, of course, a wide variety of other ways you might put this feature to use, creating JPEG images based on page layouts with photos designed in the Print module. To “print” to a JPEG image rather than the printed page, select “JPEG File” from the “Print to” popup in the Print Job section of the right panel in the Print module. You can then configure the output settings and click the “Print to File” button to generate the JPEG image(s) based on the current layout.

When you want to print to paper again, simply change the “Print to” popup back to “Printer” and the Print button will be available again.